
How to use GitLab-CI with a GitHub-hosted repository
November 16, 2019
In response to my previous article, Solo DevOps, a reader asked me to recommend a Continuous Integration (CI) tool to use with GitHub-hosted repositories. My choice is GitLab-CI, which integrates nicely with GitHub, even if you don’t want to switch to GitLab entirely.
In this post, I walk through configuring GitLab-CI for a GitHub-hosted repository. I have chosen one of my real repositories, github.com/flimzy/anki, although I have simplified the configuration a bit, for this demonstration.
Goal
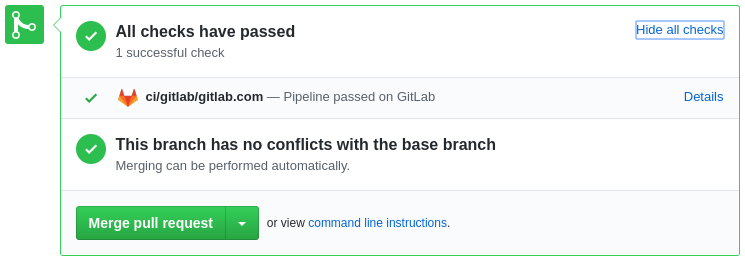
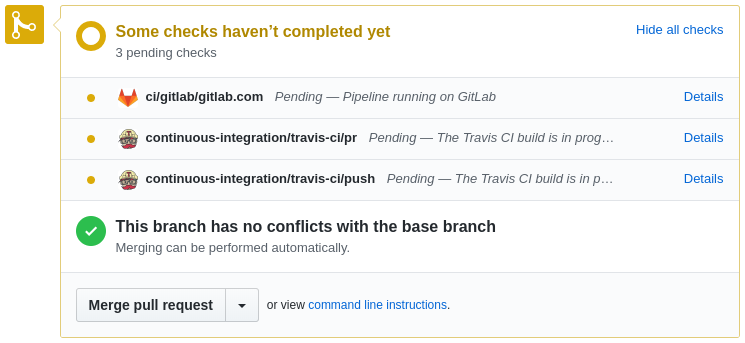
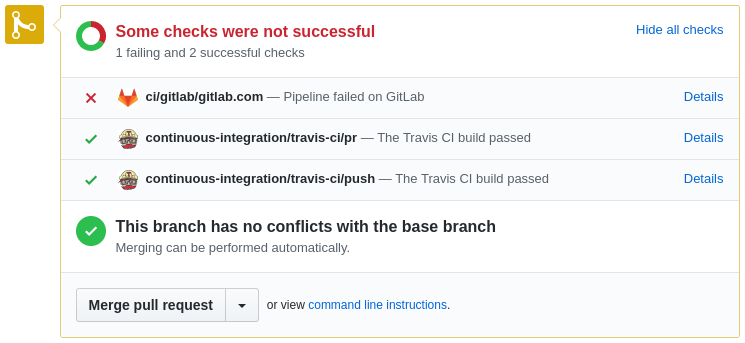
Our end state should look something like this, on a pull request in GitHub:
Assumptions
In this guide, I assume you already have a GitHub project set up. You may or may not already be running an existing CI service. In this guide, I will migrate from Travis-CI, but you may be migrating from any other CI service, or none at all. The process is the same.
I also assume that you know what commands need to be run in your CI pipeline to run your tests or linters, etc.
This tutorial also assumes little or no knowledge of GitLab at all. If you are already familiar with GitLab, or simply prefer higher level instructions, the official GitHub integration documentation from GitLab may be right for you.
Create a GitLab Account
Naturally, to integrate with GitLab-CI, you must create a GitLab account. For open-source projects hosted on gitlab.com, this is free with 2,000 monthly CI minutes. For private projects, as of September 22, 2019, you will need the Silver plan, from USD $19/month.
If you already have a GitLab account with the appropriate subscription, just log in and jump to the next section.
For this tutorial, we will assume an open-source project, which requires no paid subscription.
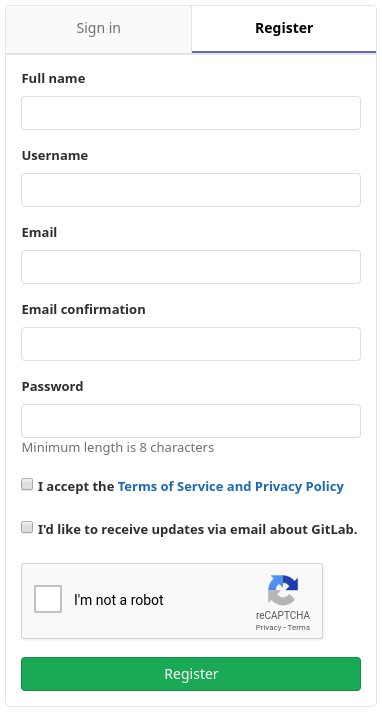
Creating the account is very straight forward. Go to gitlab.com, click the Register link, then simply fill in the requested information.
Note that you can also register with one of several existing social logins, including Google or even your existing GitHub account.
Once you are logged in, GitLab will send an email validation to you. It is important to complete the email validation, because you won’t be able to use CI/CD features until you have done so.
Create a GitLab Project
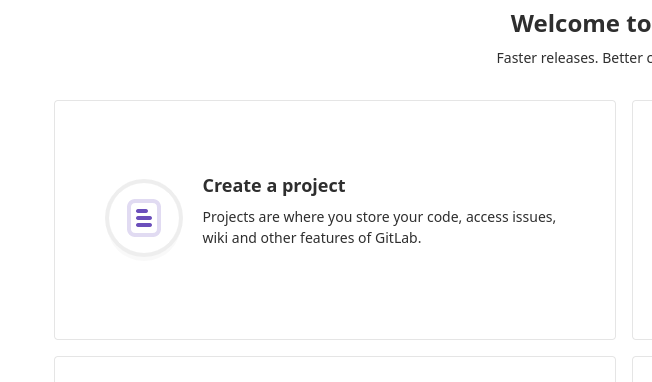
If this is your first time using GitLab, you will see an opening screen with a Create a project button:
If you already have at least one project on GitLab, instead look for the green New project button at the top of the page:
![]()
Or click the plus icon () on the menu bar, then New project.

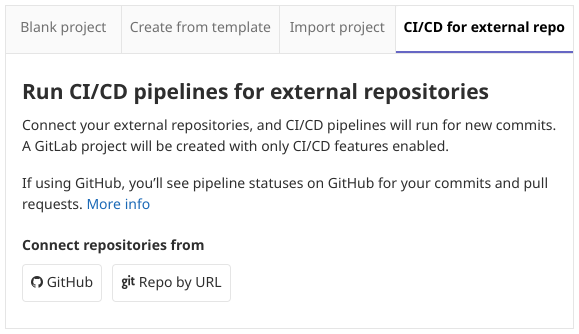
On the following page, you’ll see a list of four tabs. Click the fourth tab, CI/CD for external repo, then click the GitHub button.
GitHub Authorization
The first time you do this, you will need to authorize GitLab to access your GitHub account:
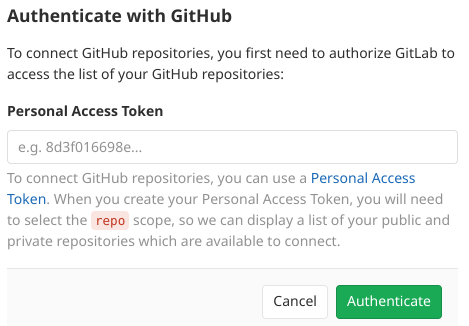
Click the Personal Access Token link in the text, or navigate to https://github.com/settings/tokens to visit your GitHub profile. If you aren’t logged in to GitHub, you will be required to do so.
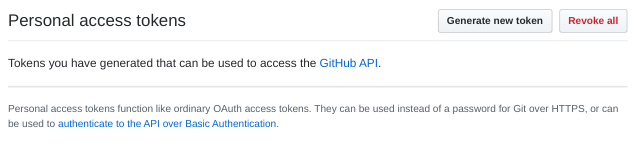
Click the Generate new token button at the top.
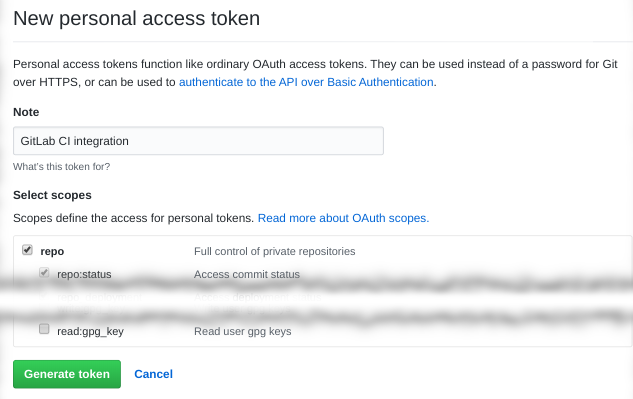
Enter a descriptive name for the new personal access token, such as “GitLab CI integration”. Then select the repo scope. Leave everything else on the page blank, then click the Generate token button.

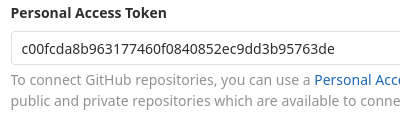
You will then be shown your new GitHub authentication token, which will appear
as random letters and numbers. Copy this token (you can simply click the
![]() icon), then paste it into the appropriate field back on your GitLab page.
icon), then paste it into the appropriate field back on your GitLab page.
GitLab will then synchronize with GitHub, then show you a list of GitHub repositories you have access to, which may include repositories belonging to any groups you are a member of.
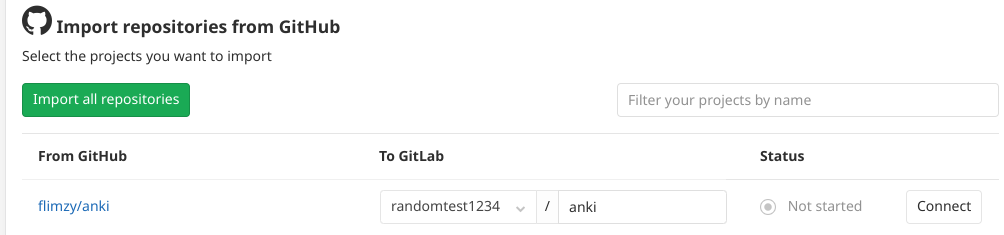
In place of “randomtest1234”, you’ll see the name of your GitLab account.
Click the Connect button, and the synchronization process will begin. This may take anywhere from just a few minutes, to potentially a few hours for very large projects, or during peak times.

Configure GitLab CI
Once your project is synchronized with GitLab, the fun begins! Now you need to create your GitLab CI configuration. There are many advanced features available in GitLab CI, but for this tutorial we are only going to set up a simple test, copied from my existing (simplified) Travis-CI configuration:
language: go

go:
    - 1.13.x

script:
    - go get -u github.com/mattn/go-sqlite3 github.com/jmoiron/sqlx
    - go test github.com/flimzy/anki
Just to be clear what this configuration does: It specifies that Go 1.13.x should be used to run the CI pipeline, it installs a couple of dependencies, then runs the automated test suite. Pretty straight forward.
GitLab requires a different configuration, but we can at least copy and paste the two specific commands (to download dependencies, and to run the tests). But I’m getting ahead of myself.
Create a Feature Branch
I hope you’re using feature branches. And configuring a new CI tool should be considered a feature. So from your local copy of your GitHub project, create a feature branch:
$ git checkout -b gitlabci
Minimal Configuration
Now create a new file called .gitlab-ci.yml, and put this minimal content
in it:
stages:
    - test

test:
    stage: test
    script:
        - echo "Success!"
Now commit and push:
$ git add .gitlab-ci.yml
$ git commit -m "Minimal GitLab CI configuration"
$ git push origin gitlabci
Go to your project on GitHub, and create a pull request.

Now on the Pull Request page, you should see the pending CI job(s). In my case, the Travis-CI jobs and the GitLab CI jobs both show up.
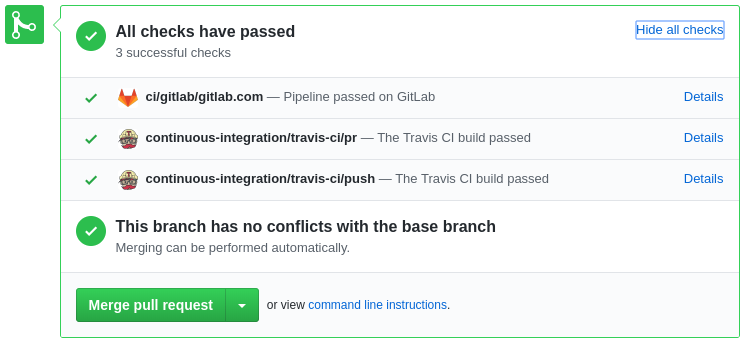
After a few moments, you should see that CI has passed successfully.
If you see a failure instead of success, you’ll need to stop here and debug the problem before continuing.
Troubleshooting
Now let’s make our new CI configuration fail, so we can experience how to troubleshoot.
Open the new .gitlab-ci.yml file in your editor, and add a new line to the
end:
- exit 1
So the entire file should now look like this:
stages:
    - test

test:
    stage: test
    script:
        - echo "Success!"
        - exit 1
Then once again commit and push:
$ git add .gitlab-ci.yml
$ git commit -m "Test failure"
$ git push origin gitlabci
Now check the PR status again, once CI has completed, and we should see a failure for the GitLab CI pipeline. My Travis builds still succeed, because I made no changes to their configuration.

To investigate the failure, click the Details link on the right, next to the GitLab CI failure notice, and you’ll see the GitLab CI pipeline page.
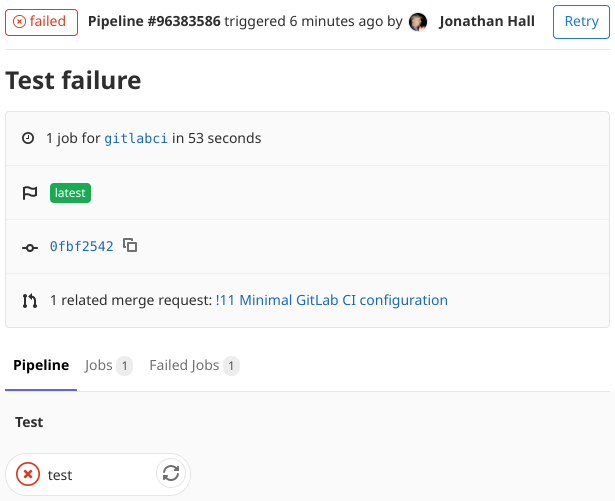
This page shows us several pieces of information synchronized from GitHub,
including the name of the feature branch (gitlabci), the name of the related
pull request (“Minimal GitLab CI Configuration”), how many jobs are defined for
the pipeline (1), and how many of them failed (1). As we’re only using a
single job in this tutorial, this part is pretty simple. More advanced users
will typically have multiple jobs defined in their pipeline.
For our purposes, we are only concerned with the failed test at the bottom.

You can simply click the retry icon () to re-run the job as-is. This may help if you have reason to believe that your job failed due to a network outage or other temporary problem. In our case, we want to examine the actual failure message, so we will click on the word test to see the job details.
On this page, we can see the full textual output of the CI job, including any error messages, which is what we’re looking for.
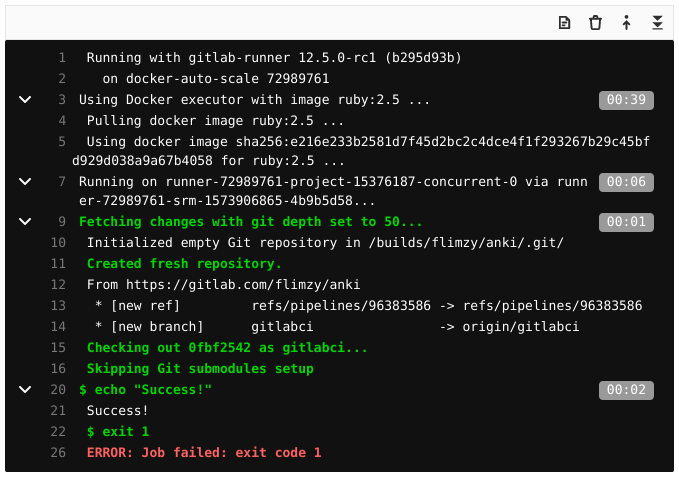
Here we see that the last command exited with exit code 1, which is what lead
to the failure. Of course we expected this, since we explicitly told the job
to exit this way when we said exit 1. In a real-world scenario, you would
hopefully find all the clues you need to your real failure.
Moving on, be sure to remove the exit 1 command we added, either by reverting
your previous commit, or by editing and re-committing the changed file.
Finalizing the configuration
My project is written in Go, so I need to configure GitLab CI to work with Go projects, the same way I did with Travis-CI. GitLab CI runs its jobs in Docker containers by default, so the easiest way to do this is by specifying an official Go Docker image to run my tests. You’ll want to adjust this to match your development environment. If you are new to Docker, you may want to read GitLab’s documentation on the topic.
In my case, I just need to add image: golang:1.13 to my .gitlab-ci.yml file,
with the result looking like this:
stages:
    - test

test:
    stage: test
    image: golang:1.13
    script:
        - echo "Success!"
And lastly, I need to replace my fake test (echo "Success!") with the real
tests. I can copy the dependency installation and test commands from my existing
.travis.yml file. The final version of my .gitlab-ci.yml file should look
like this:
stages:
    - test

test:
    stage: test
    image: golang:1.13
    script:
        - go get -u github.com/mattn/go-sqlite3 github.com/jmoiron/sqlx
        - go test github.com/flimzy/anki
Let’s commit and push this.
$ git add .gitlab-ci.yml
$ git commit -m "Finalize GitLab CI configuration"
$ git push origin gitlabci
And let’s check our PR status.
Oops! Something’s wrong. By following the steps above in the troubleshooting section, we can find the failure message.

This particular error is very specific to a Go project, but it serves as a very
useful example. The problem here is ultimately that the go tool cannot find
the project to test, because GitLab uses a different directory structure than
GitHub does.
You may well run into similar problems with your own project, depending on how
particular your project or its tooling is with regard to path configuration. You
may find that you need to modify the PATH environment variable, or set up
some symbolic links, or make other similar changes.
In my case, the solution is to create the directory structure expected by the
go tool, then create a symlink so that my project appears in the proper
location. After making these changes, my .gitlab-ci.yml file looks like this:
stages:
    - test

test:
    stage: test
    image: golang:1.13
    script:
        - mkdir -p /go/src
        - ln -s /builds /go/src/github.com
        - go get -u github.com/mattn/go-sqlite3 github.com/jmoiron/sqlx
        - go test github.com/flimzy/anki
Now if I commit and push, I see that my CI pipeline once again completes successfully.
Cleaning up
Finally, I can remove the Travis-CI configuration. This is a simple task:
$ git rm -f .travis.yml
$ git commit -m "Clean up old Travis-CI configuration"
$ git push origin gitlabci
Which gives me a nice, clean view on my GitHub PR page.
Success!
That’s it!
Merge your pull request, and enjoy using GitLab-CI with your GitHub project!